This FAQ would have documented my trunk gasket replacement except that the job became larger after discovered rust under the old gasket. It is my contention that no matter how "rust free" you think your car is, somewhere it lurks waiting to be found. And if you find rust where you can see it, rest assured that it's also hiding where you can't. Therefore, my job was expanded to a two-step process; rust repair followed by trunk gasket installation. This FAQ covers both jobs, since they were related.
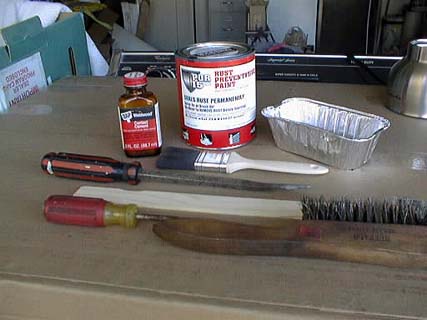
Materials you'll need
How long it will take you
I used parts of two days, in order to allow several coats of the POR 15 paint to fully dry between coats. I did the rust repair on one day and then did the gasket replacement the following day.
Where to get your materials
Trunk gasket - Nick Alexander BMW in California gave me a great price with my BMW CCA membership (cost plus 20%). The part was around $55 and they paid the shipping.
Nick Alexander BMW
6333 South Alameda Street
Los Angeles, CA 90001
323-583-1901
POR 15 - I bought a quart of the silver POR 15 paint; $29, plus $6.25 shipping. It comes in several colors and each color is designed for a specific purpose. Describe your application to the salesperson and ask them to make a recommendation.
POR 15, Inc.
P.O. Box 1235
Morristown, New Jersey 07962-1235
973-887-1999
Adhesive - I used ordinary, garden variety contact cement from DAP that I picked up at my local Home Depot.
Other stuff - The rest of the materials can be found at your local home improvement or hardware store.
Rust Repair
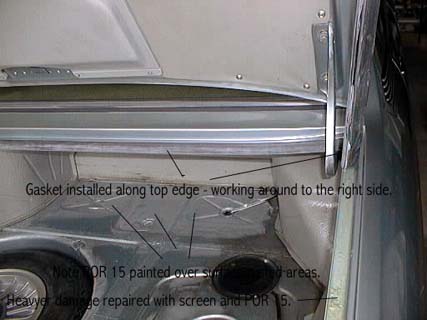
In my case, I had rust under the gasket along the top and right edges of the trunk (facing the trunk). The rust had actually eaten through the metal along the right edge and wasn't far from eating through along the top. Also note the surface rust in the trunk bottom.

The 2002 guys have been dealing with rust repair for a long time and they seem to like a product called POR 15. While I was replacing my trunk gasket, I decided to give it a try. From what I can tell it's really great stuff. It's easy to apply and dries to a very hard finish that appears to be as hard as metal.
Step 1: Remove the old trunk gasket.
Step 2: Use screwdrivers or a scraper to remove the old adhesive. This is a time consuming and tedious process, but spend the time to do a good job and get all the old adhesive off.
Step 3: POR 15 actually adheres best to a rusted finish. Use screwdrivers, a scraper, or a wire brush to scrape off any loose rust. I used screwdrivers and a wire brush.
Step 4: Clean the track where the gasket fits with a vacuum cleaner, then wipe it with mineral spirits to get it nice and clean. In fact, vacuum the whole area just to keep a clean, neat work area.

Step 5: Paint the POR 15 paint along the gasket track and in any other rusted areas. It's best to use several thin coats, rather than one heavy coat. Drying time between coats is about four hours. In areas where the rust had eaten through the metal, I laid small pieces of metal screen in the track and painted the POR 15 over the screen. I also painted the underside of the eaten through areas.

Wrap-up: The POR 15 will dry to a really hard, epoxy-like finish. It certainly seems permanent, but time will tell. Make sure you follow the product
instructions. For example, re-sealing the can requires a layer of plastic wrap to keep the lid from permanently bonding to the can. It also should be stored in the refrigerator for longest life. Your spouse is going to love that.
Trunk Gasket Replacement
The trunk gasket is easily replaced, but a patient, methodical approach pays off. Step 1: Make a note of the old gasket orientation and make sure you understand how the new gasket will fit before starting.
Step 2: Slip the new gasket over the open trunk lid.
Step 3: The contact cement sticks quickly, so it's best to work in small sections from the top down, so you're not leaning in the adhesive. Apply contact cement to the metal surface of the gasket track in the section where you'll be working.
Step 4: Apply adhesive to the surface of the gasket that matches the area where you've applied adhesive to the gasket track.
Step 5: Allow both surfaces to dry for about 15 minutes, but not longer than two hours.
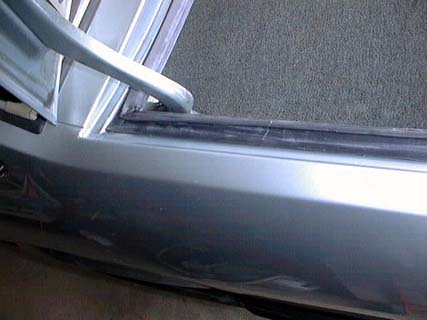
Step 6: Position the gasket and press it into the track being careful to properly fit it. The new gasket will have a small lip that overhangs the vertical edge of the track. The rear edge should be pressed down into the track. Smooth the gasket into the track, but do not stretch it as you smooth it. Downward pressure is all it takes.

Step 7: Wipe away any excess adhesive with a rag soaked with mineral spirits.
Step 8: Continue working your way around one section at a time.

Step 9: Make sure you clean up any excess adhesive with mineral spirits.
Step 10: Test the trunk lid fit and adjust if necessary.
Step 11: Close the trunk and leave it closed overnight to make sure the adhesive cures while the gasket seats well into the track.
Wrap-up: Have a beer (or several). You deserve it!
© 2001, FirstFives.org™