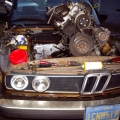

As I mentioned previously, the alternator/power steering bracket bolt hole that connects to the oil pan was no longer aligned, due to the windage tray and two oil pan gaskets. I drilled out a hole, starting with a small pilot hole and moving to the next bigger bit until the bottom of the bracket was wide enough to accommodate the oil pan bolt.

Perfect!

It looks a bit goofy, but fortunately, it is not a structural bolt (belt rotates clockwise, therefore opposed force would press the bracket into the oil pan).

I was able to source a NOS "Jules Verne" cold air valve online. This valve was NOT cheap either! I think I paid close to $400.00 bucks for it

I mentioned the corroded hose connectors in my last post, I am still waiting for fresh replacements from Latvia. However, USPS is taking FOREVER to deliver anything!

Regardless, I now have the first accessory installed. Now that the bracket is fastened, I can begin installing the accessories (minus the A/C compressor of course). I plan to remove the P/S pump and replace the lines, so I'll install the pump on the engine while it's still on the stand.

I think I mentioned this mod previously but I replaced as much of the rubber fuel hoses with CuNi (Copper Nickel) lines. I don't trust steel (rusts, obviously) and I've read nothing but great things about CuNi hard lines, so I decided to install them here. Everywhere there is a rubber hose, there's maybe...a 1/4" gap between the injector and the CuNi line.
This was a mod I wanted to do ever since I bought Eleanor. I just don't trust the excessive use of rubber hoses that BMW installed from the factory, there's just too high a risk of fuel to eventually drip and possibly cause a fire.

I decided to retain the original metal fuel lines as they were in great condition, and I didn't feel like bending and brazing CuNi lines to the degrees that the original lines are.

Here's the cold air valve with all the sensors installed. Hopefully this photo will help someone out there.

I began reconnecting the black sensor wires, and this is where my numerous photos come in handy. I was able to look back to see which wire goes where. The white harness will be much easier, but the black harness has quite a few single female blade connectors that could easily be mis-wired.

Obviously, not all of the black wires can get connected with the engine on the stand. For example, a couple of the connectors shown here connect to the ignition coil.

Test-fitting the log and runners to verify clearance of the fuel rail. Everything looks great!

I began the process of bending CuNi line for the cold injector. The marks are where I need to cut and flare. Unfortunately, my flaring tool was at my new house, so I couldn't complete this until I get that set.

I was surprised to find that the "Jules Verne" bracket didn't line up with the #3 intake runner. So I notched it out and it now fits just fine.

Another important project that I need to finish on Eleanor is to replace the windshield and rear window gaskets. The existing gaskets have hardened and honestly, is a major eyesore, so I've been looking forward to this project for a while now.
Here, I'm carefully removing the metal corner piece. I found that I needed to gouge out the rubber around it, and I could slide the trim piece (silver line) upwards, allowing me to carefully slide the corner piece back off the bottom metal trim.

This is the backside of the corner piece. Note how the edges are curved inwards, this allows the corner piece to grip on the black rubber. The large section of this piece however, slides over the lower metal trim piece.

Just be patient and these metal pieces will come off with little difficulty. The secret is to cut the black rubber away from the corners and carefully wiggle the piece off the bottom metal trim. Also, the plastic silver trim pulls upward.

With the corner piece removed, it's easier to see the metal trim piece that it slides onto (the dirty section of the large bottom metal trim).

It's likely the age of Eleanor, but pulling the silver trim off was crazy easy. I gently pulled backwards and upwards and it came free.
The next step will require a sharp knife, which I didn't have when doing this, so I'll bring a box cutter with replacement blades with me next time.
As always, MTF.
Mike