A/C installation from scratch
-
Theotherotter
- Posts: 91
- Joined: Mon May 15, 2023 6:16 pm
Re: A/C installation from scratch
This kind of thing is eventually going to inspire me to DIY an effective AC system for my Fiat one day.
Re: A/C installation from scratch
Theotherotter wrote: Thu May 07, 2026 3:18 pm This kind of thing is eventually going to inspire me to DIY an effective AC system for my Fiat one day.
Mike W.
02 525ita. Wife's, aka grocery getter
02 530i. New to the fleet, 3 pedals.
03 QX4, AKA the Datsun. Finally got the 4WD vacationmoble to stop smoking.
07 Xterra. Still on the DL, a purchase from hell.
02 525ita. Wife's, aka grocery getter
02 530i. New to the fleet, 3 pedals.
03 QX4, AKA the Datsun. Finally got the 4WD vacationmoble to stop smoking.
07 Xterra. Still on the DL, a purchase from hell.
-
Theotherotter
- Posts: 91
- Joined: Mon May 15, 2023 6:16 pm
Re: A/C installation from scratch
It was delivered with AC! But AC in Spiders was never very good, though it was good enough to help in Atlanta summers when you had to get the top up because of rain or whatever. The system is still all there except for the compressor, special bracket and belt.Mike W. wrote: Fri May 08, 2026 11:46 amTheotherotter wrote: Thu May 07, 2026 3:18 pm This kind of thing is eventually going to inspire me to DIY an effective AC system for my Fiat one day.Wow, now that's ambitious!
It would be relatively easy to put functioning AC back into my E12 - everything behind the firewall is still there, and I’ve talked to AC Solutions about the front half of the system - but I may or may not ever get to this. The Fiat is a lifetime car for me.
-
Robert Bondi
- Posts: 403
- Joined: Sun Jan 11, 2009 12:33 am
- Location: Austin, TX
Re: A/C installation from scratch
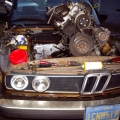
I knew body work was coming, but a closer look at the front end really made it clear that installation of the AC condensor really forces the issue now. On my Euro car, the upper front apron is really gone and there is some nice previous owner work on the passenger front corner....the bright orange in the corner is the spray-in expanding foam in a can that you might buy at Home Depot. This piece of sheet metal is the attach point for all the front grills and the head light buckets and it's gone enough that 2 of the 6 mount points for right front grill are gone.
This is text book example of project scope creep. I'm now doing body work instead of AC. Replacing the upper front apron requires removing both front fenders and the fenders basically force you to remove the lower rocker panel strips........now you find yourself on the front side of the back wheels!
Full front view with the destination for the new condensor. The shiny new Ron Davis all-aluminum radiator stands out amidst the iron(III) oxide carnage.

Side corner view.

Side corner close-up and the spray-in foam.

New sheet metal. I've been planning this for a long time, but was setting it aside more for the final cosmetic work. I've also got a nice pair of new Euro fenders. I''m no body work expert, so the good news is that most of this stuff is bolt-on/screw-on, except that nasty upper apron. That will require drill out of all those spot welds that remain. The Euro lower valence is least available (been checking for years), so looks like I'll be repairing that piece as another POR15 project. Fortunately, the lower valence is decent enough where I've not completely lost the edge anywhere.

Unfortunately, so much of the Euro front bumper mounting design depends on female capture structures for square nuts and square shoulder bolts. It's great when it's new, but when rusty and bound up, that capture structure gets abused and mangled when the rusty square nut inevitably starts to turn with rusty bolt. The chrome finish is fine on this bumper corner, but it's getting replaced just because of that rusty mount shown on the back side.

This is text book example of project scope creep. I'm now doing body work instead of AC. Replacing the upper front apron requires removing both front fenders and the fenders basically force you to remove the lower rocker panel strips........now you find yourself on the front side of the back wheels!
Full front view with the destination for the new condensor. The shiny new Ron Davis all-aluminum radiator stands out amidst the iron(III) oxide carnage.
Side corner view.
Side corner close-up and the spray-in foam.
New sheet metal. I've been planning this for a long time, but was setting it aside more for the final cosmetic work. I've also got a nice pair of new Euro fenders. I''m no body work expert, so the good news is that most of this stuff is bolt-on/screw-on, except that nasty upper apron. That will require drill out of all those spot welds that remain. The Euro lower valence is least available (been checking for years), so looks like I'll be repairing that piece as another POR15 project. Fortunately, the lower valence is decent enough where I've not completely lost the edge anywhere.
Unfortunately, so much of the Euro front bumper mounting design depends on female capture structures for square nuts and square shoulder bolts. It's great when it's new, but when rusty and bound up, that capture structure gets abused and mangled when the rusty square nut inevitably starts to turn with rusty bolt. The chrome finish is fine on this bumper corner, but it's getting replaced just because of that rusty mount shown on the back side.
Robert
77 530i
77 Euro 528
77 530i
77 Euro 528