rear light cluster R+ R
Posted: Mon Mar 29, 2021 10:50 am
One of the beauties of the E12 v;'s E28 is that some parts are re-buildable, such as the rear tail light cluster.
Below is photo and description of what I did to a set of mine to make it all good again. They were pretty dirty and had signs of corrosion on some bulbs.

SYMPTOMS
- no light
- intermittent light ( can move bulb too + fro and it works sometimes
probable causes
- faulty bulbs - easy fix - just replace with new of know good bulb
- corroded connections or earth plate - after 40 years what can you expect - see below to correct
DESIGN
e12's use 4 x 21w/32 CP and 1 x 10w 6 CP bayonet bulbs
like this narva bulb

These bulbs are located in a plastic bulb holder with a spring loaded copper strips attached - this contacts with bottom "positive " end of the bulb.
each bulb holder is held to an earth plate with a press-in tapered side ears . This earth plate is a single galvanised steel plate the is approx 60mm wide and 320mm long.
At each bulb location is a cut out in the earth plate which has 2 ears that are folded downwards
Each bulb holder has copper strip that has a coloured cable which runs to the central plastic 6 pin connector. These colours coincide with the required function;
stop
indicate
driving (night time (tail light)
reverse
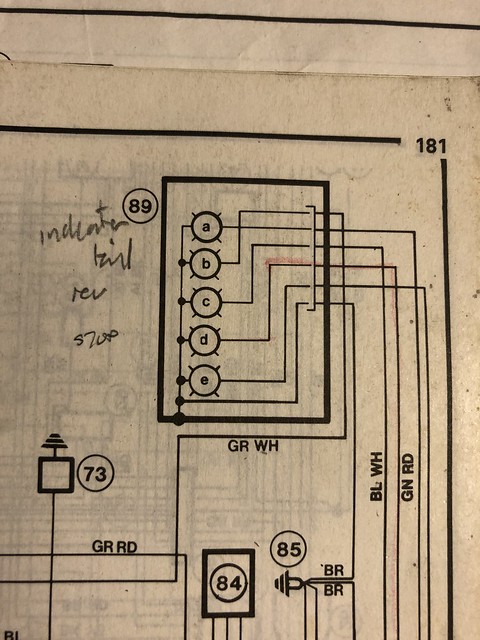

I wonder what e (fifth bulb is for?
The bulb has 2 x lower side ears/pins are "negative (earth)" which when pressed into the bulb holder and rotated then makes contact with the 2 ears in the earth plate.
The earth plate connects into the top left pin of the 6 pin connector
The earth plate is held to a plastic cover with 2 very stiff tapered clips.
This whole assembly can be disassembled.
DISASSEMBLY
1. remove all bulbs ( push and rotate 30 degrees then pullout)
2. using fingers or (screwdriver if you have to) - gently push the top tapered clip inwards and gently pull up the earth plate just enough to clear the indent( note - you don't want to push too hard and break the plastic ears)

3, using fingers or (screwdriver if you have to) - gently push the bottom tapered clip inwards and gently pull up the earth plate just enough to clear the indent - whole assembly ought to come off with a bit of gentle wiggle
4, using fingers gently do same with each bulb holder (ie push clip ears inwards) I found, do one side first and the other just falls out.

5. with all bulb holders out, clean the surface of the earth plate - with scotch brite pad, sand paper, wire bush etc - what ever works for you

6. clean the inside of the earth plate ears at each bulb holder- a small curved file ( 6mm dia ) or rolled up sand paper on a nail or screw works okay, till the metal looks clean and maybe even shiny.

before ^
after v

7. reinsert bulb holder and good bulb and test - by - install a clipped wire to the earth pin of the 6 pin connector , then connect that to a 12v battery earth connected cable , then with a positive connected cable touch the other pins on the 6 spin connector and respective light ought to light up. If does, all good, move onto next step

if not, go back to step 4 then 5 and clean up the earth plate ears better, then retest.

8 If satisfied all light are now working, reinstall whole assembly to plastic cover. A hard snap is heard when the plastic ears clip in tightly.
Note my plastic holder was very dirty , so I cleaned it up with kero and tooth brush followed by velvet soap on a microfibre towel - worked very well
9 I test again just to make sure, otherwise reinstall into vehicle.
Hopefully now all your lights are working brightly.
UPGRADE
if you want to upgrade to brighter lights or more Brake light lights,, then install LEDS - once I know how to do that I can post here
Below is photo and description of what I did to a set of mine to make it all good again. They were pretty dirty and had signs of corrosion on some bulbs.
SYMPTOMS
- no light
- intermittent light ( can move bulb too + fro and it works sometimes
probable causes
- faulty bulbs - easy fix - just replace with new of know good bulb
- corroded connections or earth plate - after 40 years what can you expect - see below to correct
DESIGN
e12's use 4 x 21w/32 CP and 1 x 10w 6 CP bayonet bulbs
like this narva bulb
These bulbs are located in a plastic bulb holder with a spring loaded copper strips attached - this contacts with bottom "positive " end of the bulb.
each bulb holder is held to an earth plate with a press-in tapered side ears . This earth plate is a single galvanised steel plate the is approx 60mm wide and 320mm long.
At each bulb location is a cut out in the earth plate which has 2 ears that are folded downwards
Each bulb holder has copper strip that has a coloured cable which runs to the central plastic 6 pin connector. These colours coincide with the required function;
stop
indicate
driving (night time (tail light)
reverse
I wonder what e (fifth bulb is for?
The bulb has 2 x lower side ears/pins are "negative (earth)" which when pressed into the bulb holder and rotated then makes contact with the 2 ears in the earth plate.
The earth plate connects into the top left pin of the 6 pin connector
The earth plate is held to a plastic cover with 2 very stiff tapered clips.
This whole assembly can be disassembled.
DISASSEMBLY
1. remove all bulbs ( push and rotate 30 degrees then pullout)
2. using fingers or (screwdriver if you have to) - gently push the top tapered clip inwards and gently pull up the earth plate just enough to clear the indent( note - you don't want to push too hard and break the plastic ears)
3, using fingers or (screwdriver if you have to) - gently push the bottom tapered clip inwards and gently pull up the earth plate just enough to clear the indent - whole assembly ought to come off with a bit of gentle wiggle
4, using fingers gently do same with each bulb holder (ie push clip ears inwards) I found, do one side first and the other just falls out.
5. with all bulb holders out, clean the surface of the earth plate - with scotch brite pad, sand paper, wire bush etc - what ever works for you
6. clean the inside of the earth plate ears at each bulb holder- a small curved file ( 6mm dia ) or rolled up sand paper on a nail or screw works okay, till the metal looks clean and maybe even shiny.
before ^
after v
7. reinsert bulb holder and good bulb and test - by - install a clipped wire to the earth pin of the 6 pin connector , then connect that to a 12v battery earth connected cable , then with a positive connected cable touch the other pins on the 6 spin connector and respective light ought to light up. If does, all good, move onto next step
if not, go back to step 4 then 5 and clean up the earth plate ears better, then retest.
8 If satisfied all light are now working, reinstall whole assembly to plastic cover. A hard snap is heard when the plastic ears clip in tightly.
Note my plastic holder was very dirty , so I cleaned it up with kero and tooth brush followed by velvet soap on a microfibre towel - worked very well
9 I test again just to make sure, otherwise reinstall into vehicle.
Hopefully now all your lights are working brightly.
UPGRADE
if you want to upgrade to brighter lights or more Brake light lights,, then install LEDS - once I know how to do that I can post here
