multi-layered sheet metal

Post your E12 technical questions and comments here. Please, no off-topic posts.

Moderators: Mike W., Pierre

Post Reply
User avatar
Robert Bondi
Posts: 348
Joined: Sun Jan 11, 2009 12:33 am
Location: Austin, TX

multi-layered sheet metal

Post by Robert Bondi »

I'm working on the restoration car addressing all the rust spots with the rear end stuff all removed. After getting into the worst spot on the car, I'm still a bit surprised at how this is constructed. On some of the worst spots on the car, the good news is there's actually multiple layers of metal with only one of them destroyed; on the other hand, it's also this multiple layer design that provides an opportunity for water to get trapped and start rusting. Is this common for body work or just a BMW thing of this time period?

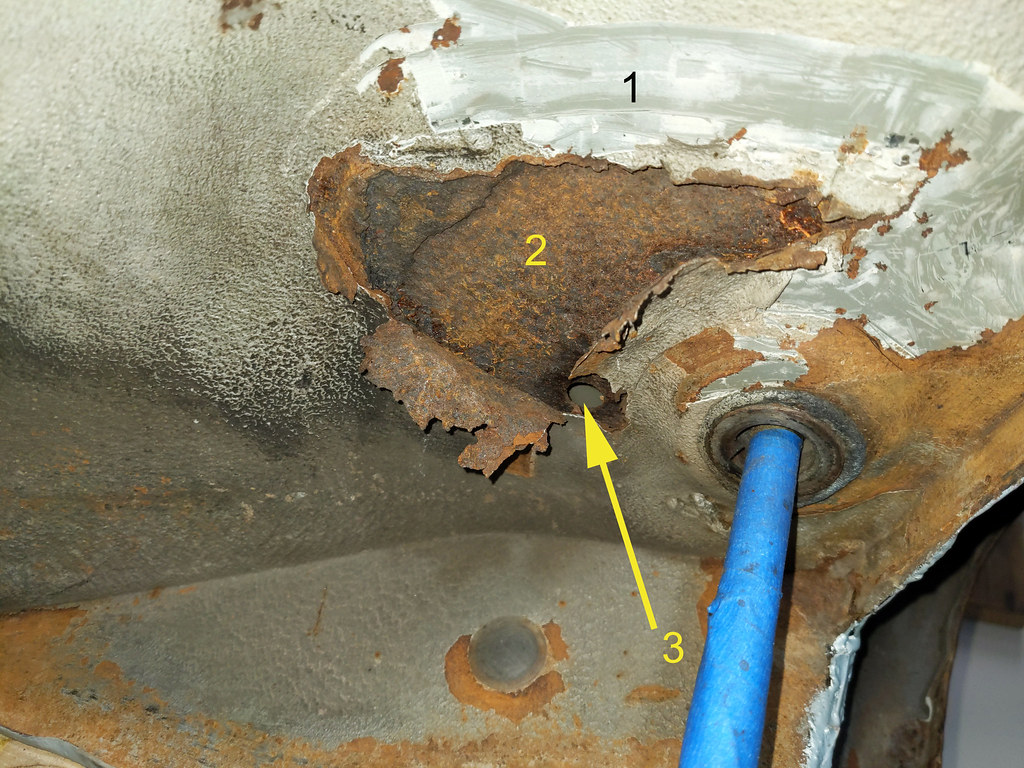
There are at least 3 layers of thin sheet metal in the region immediately in front of the right rear subframe mount enumerated
in the pictures:

layer1: Ths is the outermost layer, totally destroyed and mushroomed out around the corrosion epicenter.
layer2: Ths layer has a heavy rust, pitted outer surface, but is intact. It also has a perfectly machined hole in it, clearly there by design. Is it a weep passage between layers? There may be multiple layers in this middle region.
layer3: In the picture illuminated by flash, we clearly see into the cavity to layer 3. It looks like a factory primed virgin surface. I'm fairly certain this is backside of the sheet metal surface of the interior. I was doing floor work from the inside last year and noticed no serious issues through the floor here, which now makes sense because of the multiple layers. I'm wondering if the open volume connects to the weep holes that run under the doors on both sides....I blew compressed air in that perfect hole in layer 2, but did not detect an obvious air flow out the nearest weep holes.

There is open volume between each of these layers, which also makes repair tricky no matter the method chosen. I'm still going POR15 as with most everything on the underside. New interior is also behind that inner layer of sheet metal now. This inspection also indicates all this sheet metal is fairly cosmetic, so clearly the serious steel taking the load from the subframe must be elsewhere.

Other question is what to do with that designed hole. I'm now leaning to preserving it but sticking a grommet there with a smaller hole in case there is a weep function. Definitely open to suggestions if somebody knows what that is.

Damage area without flash:

Image

Damage area with flash:

Image

Clean up in progress:

Image
Robert
77 530i
77 Euro 528
dutch
Posts: 14
Joined: Sat Apr 15, 2023 8:22 am

Re: multi-layered sheet metal

Post by dutch »

I`m a couple days away from dropping my rear subframe, so I will have a closer look at the construction of that area. From what I could see on mine after clearing some ubc I could reach, there is no 3rd layer. Mine is a `76 series 1 528, so there might have been an upgrade in that section..? Or maybe I just don`t see it yet. Anyways...

As far as stupid designs go, There was no intension to make these cars last for more than 10 years or so. By then it would be time for the customer to go get a brand new e28. Also sheetmetal quality and rust prevention were nothing like today...

I do think you need to rethink your phrase ; " This inspection also indicates all this sheet metal is fairly cosmetic, so clearly the serious steel taking the load from the subframe must be elsewhere."

There is the floorpan with the 2 or 3mm bracket on top which holds the rod that the subframe bolts to. That bracket and the rod get strength and stability from the box it makes with the floorpan and the "third layer"
That layer is gone and the floorpan , which is 1mm (19GA) is pitted so deep ,it has probably less than half that thickness left.
Imho, there`s nothing cosmetic about that area and you need more than por15 to fix that?

As for the wheep hole; I would punch a smaller hole in the repairpanel and plug it after rust treatment.

I`ll let you know what I find when I drop my frame. :shock:
User avatar
Robert Bondi
Posts: 348
Joined: Sun Jan 11, 2009 12:33 am
Location: Austin, TX

Re: multi-layered sheet metal

Post by Robert Bondi »

I hear you. Great response and info! It sounds like you have much more experience with body work than I do, which is near none.
I've been trying to figure out what I'm looking at in that area and have gone back and forth in my mind about how bad it is. It sounds like I've underestimated how much strength is provided by even thin layers of sheet metal forming a complete hollow cavity. I've had additional conversations offline that suggest the same.

I should look at options to do a welding repair in this spot.

Major concerns, as my extent of welding experience is just a few exhaust tack welds ~15 years ago:
1. thin, curved sheet metal is not easy, especially for the novice
2. welding under the car is another challenge for the novice
3. I'm concerned about transferring too much heat to layer 3. I've got brand new carpet and seats on the
other side of layer 3, the interior side floor pan. I don't have a feel for safe distance on this aspect (I'm likely using MIG)?
4. I've also got a tank of fuel sitting nearby since this is the right rear. That's supposed to be a separate project.
Perhaps that can be shielded with a welding blanket.

It sounds like you are working some similar projects. Let me know what you see on your car in this spot when you get a better look.

Thanks,
Robert

dutch wrote: Mon Apr 29, 2024 7:06 am I`m a couple days away from dropping my rear subframe, so I will have a closer look at the construction of that area. From what I could see on mine after clearing some ubc I could reach, there is no 3rd layer. Mine is a `76 series 1 528, so there might have been an upgrade in that section..? Or maybe I just don`t see it yet. Anyways...

As far as stupid designs go, There was no intension to make these cars last for more than 10 years or so. By then it would be time for the customer to go get a brand new e28. Also sheetmetal quality and rust prevention were nothing like today...

I do think you need to rethink your phrase ; " This inspection also indicates all this sheet metal is fairly cosmetic, so clearly the serious steel taking the load from the subframe must be elsewhere."

There is the floorpan with the 2 or 3mm bracket on top which holds the rod that the subframe bolts to. That bracket and the rod get strength and stability from the box it makes with the floorpan and the "third layer"
That layer is gone and the floorpan , which is 1mm (19GA) is pitted so deep ,it has probably less than half that thickness left.
Imho, there`s nothing cosmetic about that area and you need more than por15 to fix that?

As for the wheep hole; I would punch a smaller hole in the repairpanel and plug it after rust treatment.

I`ll let you know what I find when I drop my frame. :shock:
Robert
77 530i
77 Euro 528
dutch
Posts: 14
Joined: Sat Apr 15, 2023 8:22 am

Re: multi-layered sheet metal

Post by dutch »

Will do. Plan is somewhere next week but in reality, my plans don`t always work... :roll:

My main concern would be keeping that rod in position. It all depends on what quality level of repair you`re after. If you want to patch the pitted panel, the whole bunch needs to come out, probably including the bracket that holds the rod.

Just start wire-wheeling everything as clean as you can wide around the rusty area to make sure you can actually see what you`re dealing with.
That 3rd layer would be spotwelded to the floorpan I guess ,so make sure you get the entire panel exposed. Please post some pics of your findings. I will try to help you from a distance, but it looks like you might need some experienced help along the way...

As for your concerns;
- The welding experience... should be good to go. ...probably not... :lol:
- making a thin curved patch panel is much easier than a heavy curved panel.
- welding under the car is the same as from above. You just need earplugs.
- You need heat or the panel will fall off. The welding will be done under the rear seat so that has to come out ( 2 bolts?) Make sure you wiring is out of the way! I would opt for a bunch of wet towels and eyes inside the car while welding. Mig would be the way to go.
- I would not be too worried about the tank, unless it leaks. Make sure no sparks can fly on top and you should be fine.

Work on one side and keep the other side in tact for reference.
dutch
Posts: 14
Joined: Sat Apr 15, 2023 8:22 am

Re: multi-layered sheet metal

Post by dutch »

Ok, I dropped the carrier and here`s what I think is going on;

- Layer # 1 in your pics is the floorpan. When wire brushing you will find a foam gasket between the floorpan and the guide bushing for the threaded rod. That said, the floorpan does not add any structural strength to the mounting point.

- Layer # 2 is the lower part of a 2 part bracket you can see when you pull the rear seat.

- Layer # 3 is the top part of that bracket. This whole situation is welded to the floorpan, so your main problem here is that the floorpan is rotted right up to where the bracket is welded to it, which makes it structural.

It`s kinda hard to see from the pics how bad the pitting is on the bracket actually is and I don`t know what quality level you`re after. That part is 2mm ( 12 ga) so unless you plan on driving ralley`s , you might be ok with a serious clean up, rust converter and some kind of coating after... I would start by cutting that floorpan until you`re in healthy metal. There`s no need to worry about the position of that rod as the bracket is welded in the corner inside the car.
That section of floorpan is not that hard to make for someone with some understanding of sheet metal shaping.
Hope this helps.
Post Reply