Hi guys,
I'm in the process of bead blasting all the nice aluminum parts on the engine. Will be using a conversion coating (Alodine 1201) to preserve the fresh look indefinitely.
My question is what to do with the prominent waffle cover of the AFM. I'm concerned with bead blasting the part and having residual abrasive within it. What have you all done to it to make it look new again?
TIA!
How to make the AFM waffle cover look new again?
How to make the AFM waffle cover look new again?
Luis
1976 3.0 Si, Taiga
1973 3.0 CS, Golf
1966 1800, Turf
1976 3.0 Si, Taiga
1973 3.0 CS, Golf
1966 1800, Turf
I've been nuts enough to use a Dremel tool: spinning wire brushes of various sizes. They knock off the dirt, any powder, to polish nice little circles in all the boxes. Dark circles, not the original brand new bright light silver.
Know that the units are sealed, or something, around the top outside edge. Whatever it is turns to fudge smear with any attempts to mess with it.
If you want a new look, buy one. Otherwise I think it's the clean polished look, not great, anal, custom perfect in the squares, or e28's have black vinyl covers to snap over them.
Know that the units are sealed, or something, around the top outside edge. Whatever it is turns to fudge smear with any attempts to mess with it.
If you want a new look, buy one. Otherwise I think it's the clean polished look, not great, anal, custom perfect in the squares, or e28's have black vinyl covers to snap over them.
-
Robert Bondi

- Posts: 403
- Joined: Sun Jan 11, 2009 12:33 am
- Location: Austin, TX
Yeah, you've got to be careful with coatings just for looks on parts
with sensitive functionality. I'm always tempted myself in those sorts of
endeavors.
My solution on the AFM waffle grid was just to cover it. The E34s with M30 engine still had an AFM and they came with a black plastic cover that snaps nicely onto the top of the AFM. I don't have the P/N off hand, but you might try looking for it.
Robert
with sensitive functionality. I'm always tempted myself in those sorts of
endeavors.
My solution on the AFM waffle grid was just to cover it. The E34s with M30 engine still had an AFM and they came with a black plastic cover that snaps nicely onto the top of the AFM. I don't have the P/N off hand, but you might try looking for it.
Robert
Robert
77 530i
77 Euro 528
77 530i
77 Euro 528
-
Eddie in TO

- Posts: 284
- Joined: Tue Jan 06, 2009 10:45 am
- Location: Toronto, Canada...EH!
- Contact:

I saw very impressive results from Simple Green and a toothbrush on an E24 I used to own. It didn't look awful, but just it's age which was about 20 at that time. The new owner put more into the cosmetics than I did.
Mike W.
02 525ita. Wife's, aka grocery getter
02 530i. New to the fleet, 3 pedals.
03 QX4, AKA the Datsun. Finally got the 4WD vacationmoble to stop smoking.
07 Xterra. Still on the DL, a purchase from hell.
02 525ita. Wife's, aka grocery getter
02 530i. New to the fleet, 3 pedals.
03 QX4, AKA the Datsun. Finally got the 4WD vacationmoble to stop smoking.
07 Xterra. Still on the DL, a purchase from hell.
-
under the radar
- Posts: 106
- Joined: Fri Jan 09, 2009 12:39 am
- Location: half moon bay CA
Damn. Mine is very old and I want it to look like new again...T.Hanson wrote:I've been nuts enough to use a Dremel tool: spinning wire brushes of various sizes. They knock off the dirt, any powder, to polish nice little circles in all the boxes. Dark circles, not the original brand new bright led light silver.
Know that the units are sealed, or something, around the top outside edge. Whatever it is turns to fudge smear with any attempts to mess with it.
If you want a new look, buy one. Otherwise I think it's the clean polished look, not great, anal, custom perfect in the squares, or e28's have black vinyl covers to snap over them.
I guess your right And I would try to follow your advice. thanksRobert Bondi wrote:Yeah, you've got to be careful with coatings just for looks on parts
with sensitive functionality. I'm always tempted myself in those sorts of
endeavors.
My solution on the AFM waffle grid was just to cover it. The E34s with M30 engine still had an AFM and they came with a black plastic cover that snaps nicely onto the top of the AFM. I don't have the P/N off hand, but you might try looking for it.
Robert
Thanks for all the suggestions. I ended up having to disassemble the AFM since the rotating flap assembly was slightly dragging on the bottom of the case. The top is adhered to the box via some adhesive and also some little posts protrude though it and are either melted or pressed into the top. Hard to describe but if you inspect it you will see them. I ground those off in order to take the cover off.
This is what the bottom looks like. The bottom black cover is sealed with silicon because otherwise some of the vacuum will pull "false air" in through the flap door pivot bearings so it should be re-sealed when you are done.
<a href="https://picasaweb.google.com/lh/photo/s ... site"><img src="https://lh6.googleusercontent.com/-PKEl ... 030735.JPG" height="300" width="400"></a>
Before removing the plastic element that holds the metal wiper make a reference mark so you can place it back exactly where it was.
<a href="https://picasaweb.google.com/lh/photo/t ... site"><img src="https://lh4.googleusercontent.com/-mmRM ... 030738.JPG" height="300" width="400"></a>
And before you remove the clock spring, also make a mark on the outer wheel where the metal tab clamps it down so the flap door resistance to incoming air remains the same.
<a href="https://picasaweb.google.com/lh/photo/s ... site"><img src="https://lh4.googleusercontent.com/-r512 ... 030739.JPG" height="480" width="640"></a>
I media blasted the lid and the box and very thoroughly removed all the blasting media through repeated washing and compressed air applications.
<a href="https://picasaweb.google.com/lh/photo/b ... site"><img src="https://lh6.googleusercontent.com/-mPQQ ... 040176.JPG" height="480" width="640"></a>
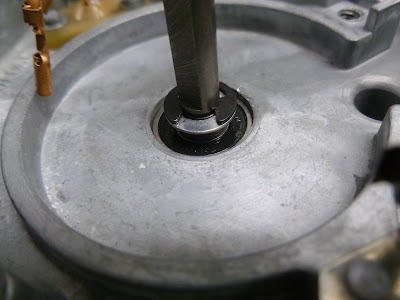
You can see the place where the door was scraping the bottom; made a little worse by my initial lame attempt at scraping the bottom to try to resolve the problem. The door pivot goes through two bearings, one on top and one on the bottom and is factory set with shims to rest above those bearings just enough to not scrape the bottom or the top. I bought some .1 mm shims from McMaster and raise the pivot/door assembly by about.2 mm. That was enough to have it swing freely not hitting top or bottom.
<a href="https://picasaweb.google.com/lh/photo/e ... site"><img src="https://lh3.googleusercontent.com/-GFVi ... 040186.JPG" height="300" width="400"></a>
Top Bearing:
<a href="https://picasaweb.google.com/lh/photo/H ... site"><img src="https://lh5.googleusercontent.com/-Fri4 ... 040184.JPG" height="300" width="400"></a>
<a href="https://picasaweb.google.com/lh/photo/s ... site"><img src="https://lh3.googleusercontent.com/-pmb4 ... 040182.JPG" height="300" width="400"></a>
Bottom bearing, under the clock spring and hybrid electronic board:
<a href="https://picasaweb.google.com/lh/photo/Y ... site"><img src="https://lh6.googleusercontent.com/-COts ... 040185.JPG" height="300" width="400"></a>
<a href="https://picasaweb.google.com/lh/photo/g ... site"><img src="https://lh4.googleusercontent.com/-4Vu0 ... 040187.JPG" height="300" width="400"></a>
This is the bottom. There is a small spring in there:
<a href="https://picasaweb.google.com/lh/photo/W ... site"><img src="https://lh3.googleusercontent.com/-hFdn ... 040180.JPG" height="300" width="400"></a>
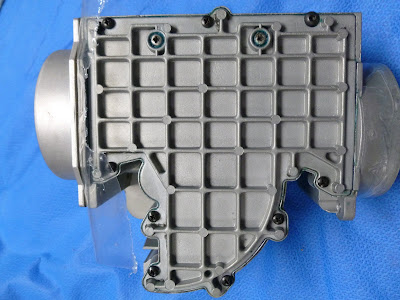
In order to replace the top, I drilled and tapped 3mm threaded holes after fully grinding down the small posts that previously secured the lid in place and used correspondingly sized black phillips screws. In addition, the lid needs to be sealed to avoid vacuum leaks and for that I used Hylomar. The clear sheet you see on the intake was to seal that end during my vacuum/air pressure test to locate any leaks.
<a href="https://picasaweb.google.com/lh/photo/9 ... site"><img src="https://lh6.googleusercontent.com/--p8v ... 040258.JPG" height="300" width="400"></a>
<a href="https://picasaweb.google.com/lh/photo/E ... site"><img src="https://lh6.googleusercontent.com/-HubL ... 040259.JPG" height="400" width="300"></a>
<a href="https://picasaweb.google.com/lh/photo/f ... site"><img src="https://lh5.googleusercontent.com/-cXZK ... 040260.JPG" height="300" width="400"></a>
This is what the bottom looks like. The bottom black cover is sealed with silicon because otherwise some of the vacuum will pull "false air" in through the flap door pivot bearings so it should be re-sealed when you are done.
<a href="https://picasaweb.google.com/lh/photo/s ... site"><img src="https://lh6.googleusercontent.com/-PKEl ... 030735.JPG" height="300" width="400"></a>
Before removing the plastic element that holds the metal wiper make a reference mark so you can place it back exactly where it was.
<a href="https://picasaweb.google.com/lh/photo/t ... site"><img src="https://lh4.googleusercontent.com/-mmRM ... 030738.JPG" height="300" width="400"></a>
And before you remove the clock spring, also make a mark on the outer wheel where the metal tab clamps it down so the flap door resistance to incoming air remains the same.
<a href="https://picasaweb.google.com/lh/photo/s ... site"><img src="https://lh4.googleusercontent.com/-r512 ... 030739.JPG" height="480" width="640"></a>
I media blasted the lid and the box and very thoroughly removed all the blasting media through repeated washing and compressed air applications.
<a href="https://picasaweb.google.com/lh/photo/b ... site"><img src="https://lh6.googleusercontent.com/-mPQQ ... 040176.JPG" height="480" width="640"></a>
You can see the place where the door was scraping the bottom; made a little worse by my initial lame attempt at scraping the bottom to try to resolve the problem. The door pivot goes through two bearings, one on top and one on the bottom and is factory set with shims to rest above those bearings just enough to not scrape the bottom or the top. I bought some .1 mm shims from McMaster and raise the pivot/door assembly by about.2 mm. That was enough to have it swing freely not hitting top or bottom.
<a href="https://picasaweb.google.com/lh/photo/e ... site"><img src="https://lh3.googleusercontent.com/-GFVi ... 040186.JPG" height="300" width="400"></a>
Top Bearing:
<a href="https://picasaweb.google.com/lh/photo/H ... site"><img src="https://lh5.googleusercontent.com/-Fri4 ... 040184.JPG" height="300" width="400"></a>
<a href="https://picasaweb.google.com/lh/photo/s ... site"><img src="https://lh3.googleusercontent.com/-pmb4 ... 040182.JPG" height="300" width="400"></a>
Bottom bearing, under the clock spring and hybrid electronic board:
<a href="https://picasaweb.google.com/lh/photo/Y ... site"><img src="https://lh6.googleusercontent.com/-COts ... 040185.JPG" height="300" width="400"></a>
<a href="https://picasaweb.google.com/lh/photo/g ... site"><img src="https://lh4.googleusercontent.com/-4Vu0 ... 040187.JPG" height="300" width="400"></a>
This is the bottom. There is a small spring in there:
<a href="https://picasaweb.google.com/lh/photo/W ... site"><img src="https://lh3.googleusercontent.com/-hFdn ... 040180.JPG" height="300" width="400"></a>
In order to replace the top, I drilled and tapped 3mm threaded holes after fully grinding down the small posts that previously secured the lid in place and used correspondingly sized black phillips screws. In addition, the lid needs to be sealed to avoid vacuum leaks and for that I used Hylomar. The clear sheet you see on the intake was to seal that end during my vacuum/air pressure test to locate any leaks.
<a href="https://picasaweb.google.com/lh/photo/9 ... site"><img src="https://lh6.googleusercontent.com/--p8v ... 040258.JPG" height="300" width="400"></a>
<a href="https://picasaweb.google.com/lh/photo/E ... site"><img src="https://lh6.googleusercontent.com/-HubL ... 040259.JPG" height="400" width="300"></a>
<a href="https://picasaweb.google.com/lh/photo/f ... site"><img src="https://lh5.googleusercontent.com/-cXZK ... 040260.JPG" height="300" width="400"></a>
Last edited by Luis A. on Tue May 01, 2012 5:00 pm, edited 1 time in total.
Luis
1976 3.0 Si, Taiga
1973 3.0 CS, Golf
1966 1800, Turf
1976 3.0 Si, Taiga
1973 3.0 CS, Golf
1966 1800, Turf